Using NVDA Screen Reader on Windows
Posted by Sue Lockwood
NVDA stands for NonVisual Desktop Access and is a FREE screen reading app for Windows OS. Emphasis on the “free”, as there are other Windows screen readers out there with prices that will make you spit-take across your monitor. (Is there such a thing as a subtweet inside a blog post?) If you do end up using NVDA in your development process, please donate to them, as we all know free software isn’t technically free.
Windows & Linux users go away for a second. Mac users, hello. You have a screen reader called VoiceOver built into your OS. It’s convenient and a great place to start when doing accessibility work, but only 1/3rd of people who need screen readers to view the web use VO. Consider installing a screen reader like NVDA onto whatever environment you use for IE testing, whether it’s a VM or separate Windows machine.
To get started with NVDA, download the .exe file from their site and install it. Make sure you chose the option to create a shortcut (ctrl+alt+n). They provide a User Guide (which is written in beautiful, CSS-less HTML markup) that provides more detail about system requirements, installation and use.
If you’ve used other screen readers before, you’ll be familiar with the concept of setting a key or combination of keys to precede commands for interacting with the screen reader. In VoiceOver on MacOs, it’s called the VO key (control + option by default). For NVDA you can set it to be the capslock key on start, but by default it is the insert key. My Surface Pro 2 doesn’t have an insert key, so I opted for capslock. If at any point I need to use the capslock key to do its regular job of letting people know I AM SHOUTING AT THEM ON THE INTERNET, I need only press it twice.
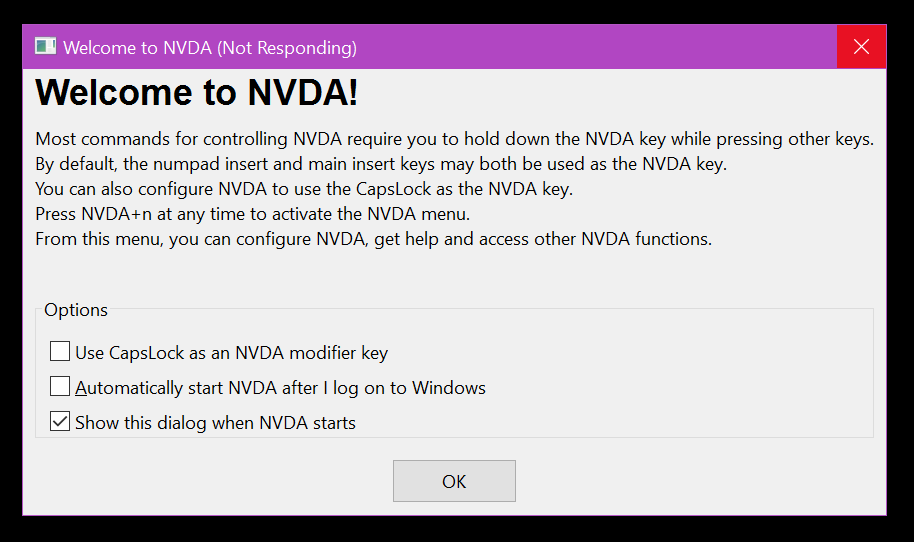
This is telling the program to be in ‘Laptop mode’, with ‘Desktop mode’ being it’s default. The key commands are different for each mode. Desktop mode assumes that your keyboard has a number pad, where in Laptop mode, the commands are designed around the capslock key. The rest of this blog post is going to assume that the ‘Use CapsLock as an NVDA modifier key’ has been checked on start.
NVDA is running, now what?
The first thing you notice after starting up NVDA is that your computer now has a terrifying new voice. If I heard this voice in a sci-fi movie, I’d immediately conclude that this piece of talking technology was definitely planning to violate Isaac Asimov’s “Three Laws of Robotics.”
NVDA is open source and users have contributed to it so that you may get different non-murder voices. I stuck with eSpeak, the default, after reading how it’s responsive, has the ability to speak in over 30 languages, and is understandable at fast rates (this is straight from the wiki). Upon learning it can speak 30 languages, I headed quickly to my favorite Japanese wrestling site, NJPWworld.com, only to discover that to my extreme disappointment, Japanese is not one of them. You can see all the language capabilities of eSpeak here.
Visual speech output
Instead of solely relying on the scary robot voice to read the site to you, you can enable a feature that will output what it says into a small window on your screen. I’ve found this mode to be really useful and overall less nightmare-inducing.
To start this, right click on the NVDA icon and select Preferences -> Synthesizer. Then select the Display synthesizer and click OK. If you want to save your changes to make them permanent, right-click the NVDA icon again and save settings.
Enabling this helps with creating bug reports for unexpected reading behavior. When working on a team and doing QA, instead of relying on them to run NVDA to recreate the issue via sound, you can screen shot the output and page, just as you might a visual bug. Another important benefit of enabling this for a sighted developer is that it will force them to focus on the content that is read via screen reader, which might be missed when the text to voice options are still novel, i.e., being more focused on how scary that robot voice is than what it’s saying.
Basic Commands
Screen readers are complex. There are many hotkeys, modes and UI components to learn and it can be overwhelming. I’m making the assumption that you, the person reading this, are a programmer or designer who does not need to use a screen reader in order to interact with the web, but is interested in making sure that your work is accessible. Chances are the time you spend with a screen reader running will only be a few hours a week, and the reward for learning all those hot keys is minimal since this is not your only means to traverse the web. Assuming that’s the case, I want to give you some basic commands to get started with and refer back to later.
Browse Mode
NVDA has different modes for different actions. There’s Browse mode, Forms/Focus mode and Application mode. (Note: NVDA uses the terminology Focus Mode, and JAWS, a popular, not-at-all-free screen reader, uses Forms mode. As far as I can tell, it’s the same mode). While in Browse mode, it’s assumed that you are reading and your keyboard’s keys have additional hotkey functionality to make that easier. In Focus mode and Application mode, those hotkey functions are turned off so you can type words naturally on the keyboard.
Reading
All of the following commands are for when you are in Laptop Mode and using the capslock key as your NVDA modifier. If you have a number pad on your keyboard, see the User Guide to look up the key commands for Desktop Mode.
- Stop speech:
control - Pause speech:
space - NVDA menu:
capslock+n - Quit
capslock+q - Start reading whole page from current position:
capslock+down arrow - Read current line:
capslock+up arrow
Navigating
While in browse mode, you can navigate around the page using the following commands.
- Move to next focusable element:
tab - Navigate through landmarks:
d. (Landmarks are created with aria-label attributes, for more info see my VoiceOver post) - Navigate through links:
k - Navigate through headings:
h - Navigate through headings level 1 to 6:
1 - 6 - Navigate through forms:
f - Navigate through tables:
t - Navigate table content:
ctrl+alt+ up, down, left or right arrow - Navigate through buttons:
b - Navigate through lists:
l - Navigate through list items:
i - Navigate through graphics / images:
g
NVDA has additional single key commands, but these are enough to get you started. Depending on how much you use it, it might be worth learning additional hotkeys.
Advanced Navigation
If you’ve ever used the VoiceOver screen reader that comes with the MacOS, you might be familiar with the Rotor Menu. NVDA has a similar menu that lists all the elements on the page. You can access this by pressing capslock + f7 (don’t forget the fn key).
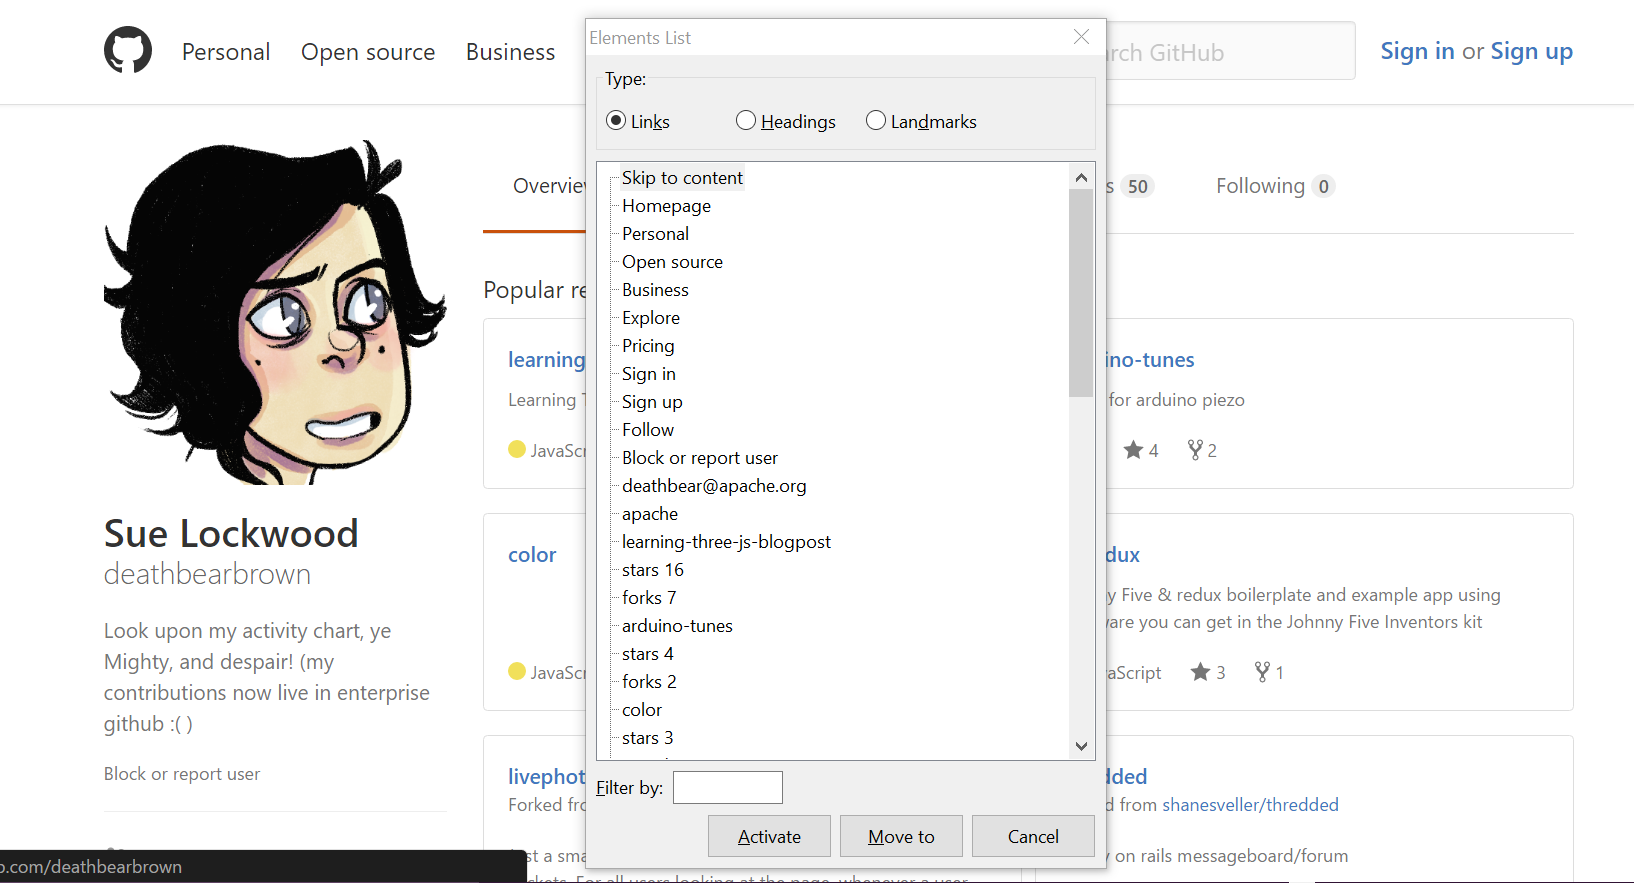
Advanced Elements list menu open on Sue Lockwood’s github homepage
You can select Links, Headings or Landmarks by using the left and right arrow keys. Use tab or shift + tab to enter the menu area and the up and down arrows to select an item in the tree.
Aside from interacting with this menu to navigate a site, you can do a quick audit to see if your link text is descriptive enough. If you have mostly ‘read more’ or ‘here’ link text, you aren’t providing enough context about the link.
Focus/Forms Mode
Since many letter keys have different uses in browse mode, entering Focus Mode will give you back access to those keys as letters. NVDA will automatically enter/exit focus mode when the tab key is used to move focus on/off the form field, but not if the cursor keys are used. You can also enter focus mode by being on a form element and then typing capslock + space. Now you will be able to type naturally in an input or text area. To exit form mode, use the same command capslock + space.
- Navigate to Next form:
tab - Navigate to Previous Form Control:
Control Shift + Tab - Select and Deselect Checkboxes:
spacebar - Open Combo Box/Jump Menu/Auto-complete Menu:
alt + down arrow - Select Radio Button:
up or down arrow - First letter Select Element in Combo Box:
up or down arrow - Checkbox:
x - Combo Box:
c - Radio Button:
r - Submit Form:
enter
Try interacting with a form which has a <textarea>. Notice how if your HTML is not written semantically, using <button> tags for submit buttons, it makes it much more difficult to submit a form. JavaScript lets us get away with putting interactions on many elements, but when you stray too far from writing semantic HTML, you are making your application unusable and broken for many people.
One thing to be aware of while in Focus Mode is how you interact with radio buttons. You can select radio buttons without being in Focus mode, but only in Focus mode can you use the arrow keys to cycle through the radio buttons in a group.
Troubleshooting Tip: Sometimes when interacting with radiobuttons you might assume they are broken because the arrow key interaction isn’t working. If this happens, make sure to check first if you are in Focus Mode!
There is an additional mode for desktop applications. It behaves similarly to Focus Mode by letting the user type naturally without triggering any hotkeys attached to letters. It’s useful if you are trying to troubleshoot a desktop app, but since I focus primarily on the web, I haven’t learned much about it. According to WebAIM, many screen reader users aren’t aware it exists.
Are all browsers equal?
Many screen readers have browsers they pair better with than others, like VoiceOver and Safari. I’ve been told that Firefox is the best browser to use with NVDA to test for compliance, because they are both open source and therefore are updated more quickly. I would recommend using Firefox as your primary browser and testing in multiple browsers to be thorough.
(I’d also like to make a shout out to Jennifer Sutton for her help in furthering our education with A11y with her comments on the Bocoup blog.)
Next Steps
Now you have NVDA running, you are reading, you are navigating, and you’re ready to party. What are the next steps to testing your web app? Here are some basic things to look for immediately:
- Headers – Do your headings suggest a logical structure of your content? If you’re just seeing
<h1>tags, that is bad news bears. Do your sub headers make sense under their parent headers? - Images – Do your images have alt text? If the image is an important part of understanding your content, make sure to have text that explains what it’s conveying. Without alt text the screen reader will read the file name, which often doesn’t offer much information about the image. (So writes the person with multiple screenshots named asdasdassds.png on her desktop.)
- Form labels – Do your form fields and buttons have labels? If they do you will hear the screen reader say “Address: edit” but without labels it will simply say “edit,” giving no context.
- Required Fields – use the
aria-requiredattribute to tell the screen reader a particular field is required. Finding out a field is required on submit is annoying for everyone, that’s why little red asterisks were invented. (Screen readers don’t care about little red asterisks by the way.)
This is just a place to start. There’s so much more that you can do to make your site accessible. If you want to learn more things you can work on, my colleague, Susan Robertson, has written a series of blog posts called Accessibility Wins that cover ARIA, Accessibility with Keyboard Navigation and Accessibility with Color. You can also read some tips in my other screen reader blog post, Getting Started with VoiceOver. Once you get more used to making ARIA attributes part of your coding habits, check out this ARIA Widget Checklist: For Screen Reader Testing.
I don’t want to intimidate you with work, and it is work, but it’s good work. You will be making someone else’s life easier. You’ll be making a difference – like a super hero, except not fictional. What I’m saying is, if you make accessibility part of your workflow when coding, you’re better than Batman.
PS- Don’t forget to donate to NVDA. A lot of work went into building this screen reader and it accounts for 14% of the screen reader market share, according to a survey conducted in 2015.