Say “Hello World” with Johnny-Five on Tessel 2
Posted by Rick Waldron
Back in April I wrote about Bocoup’s excitement for the recently announced Tessel 2 in “Pushing NodeBots Into The Future with Tessel 2”. Since then, we’ve worked side-by-side with the Tessel Project to help them realize their platform vision for the next stage in the evolution of the Tessel. With shipping underway, we’re excited to start publishing a series of “getting started” guides that will provide the basic building blocks to create Johnny-Five applications for the Tessel 2.
In this first article, we’ll get familiar with writing Johnny-Five programs for Tessel 2 by writing a simple “Hello World,” then explore a couple variations on that theme. If you have any trouble along the way, with either Johnny-Five, Tessel-IO, or the Tessel 2, please ask for help in the Johnny-Five Gitter channel.
Tessel 2 Setup
This article assumes that you are familiar with running programs from a terminal, and have some experience with JavaScript, Node.js, and npm (also, that these are already installed in your system).
We need to make sure your Tessel 2 is running the latest OS images and firmware before you continue. Complete all steps in the t2-start guide to guarantee you have the latest Tessel 2 system. If you haven’t already done so, you must complete the t2-start activity before continuing with this guide. Once your Tessel 2 is updated, come back to this article and continue to the next section.
A New Project
From within your terminal, create a new directory named tessel-projects as a sandbox for all projects you’ll create in this post. We’ll be executing all commands from within that directory. From within the new project directory, use npm to install the johnny-five and tessel-io packages:
npm install johnny-five tessel-io
To make this a valid Tessel 2 project directory, it must contain a package.json file. We only need to do this once, so go ahead and run the following, responding in the affirmative as many times as necessary to finalize the package.json setup:
npm init
Once this is complete, you’ll have the necessary local environment to build your project!
Hello World
Let’s make an LED blink—no more, no less.
Parts list:
- (1) LED of any color
- (1) Tessel 2
Once these parts are inventoried and accounted for, create a file called blink.js and open it in your preferred editor. Type, or copy and paste, the contents of the following program:
// 1
var five = require("johnny-five");
// 2
var Tessel = require("tessel-io");
// 3
var board = new five.Board({
  // 4
  io: new Tessel()
});
// 5
board.on("ready", function() {
  // 6
  var led = new five.Led("a0");
  // 7
  led.blink(500);
});
Let’s break that program down:
- Require the Johnny-Five module.
- Require the Tessel-IO module. This class is used by Johnny-Five to communicate with the Tessel 2’s SAMD21 coprocessor.
- Initialize a new instance of the
Boardclass, specifying thatiowill be provided by a new instance of theTesselclass. TheTesselclass is an IO-Plugin, meaning it will produce objects that are API-compatible with Firmata.js. (This makes it the fifteenth module in the growing family of IO plugins!) - Create a “ready” event handler, which is called once Johnny-Five and Tessel-IO have completed any initialization that must be done.
- Once the
boardhas signaled that it is “ready,” create a new instance from theLedclass 0, specifying that the LED itself is attached toPORTA, pin0using the shorthand string notation"a0"(Tessel-IO Pin Naming Guide). - Call the
blink()method of theledinstance object, specifying 500ms on-off periods.
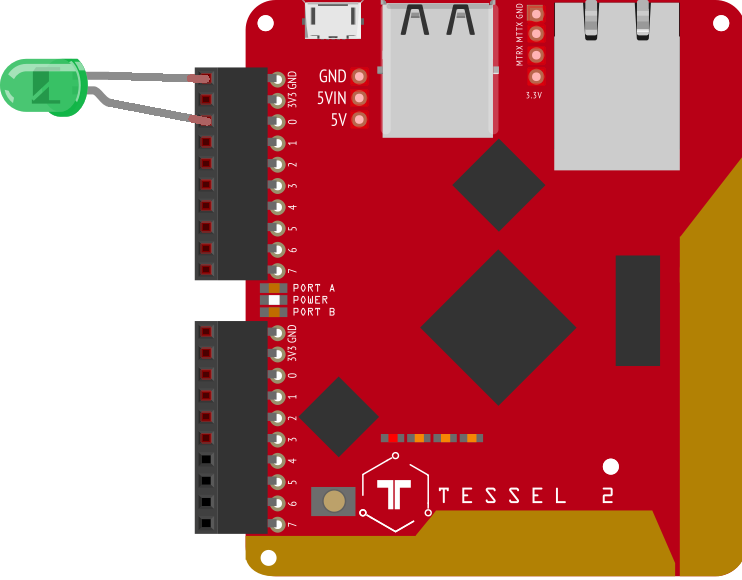
Next, attach an LED of your choice to PORT A‘s GND and 0 pins:
Return to your terminal, in the tessel-projects directory and type the following:
t2 run blink.js
You will see some output that explains what is happening, it will look something like this:
$ t2 run blink.js
INFO Looking for your Tessel...
INFO Connected to bishop over LAN
INFO Generating slim build.
INFO Writing project to RAM on bishop (xxx kB)...
INFO Deployed.
INFO Running bundled project...
And of course your LED will be blinking on-off every 500 milliseconds. Whenever you’re ready to move on, shut down the program by sending a signal interrupt (CTRL+C).
A Rainbow Connection
So far you’ve made a single LED blink, which is very exciting the first time, but trivial none-the-less. Let’s see what it takes to make many LEDs blink.
Parts list:
- (6) LEDs of any color or size (I’ll use one LED each for red, yellow, green, blue, violet & white)
- (7) Jumper wires (one for each LED and one for
GND) - (1) Solderless breadboard
- (1) Tessel 2
Start by creating a new file called rainbow.js and open it in your preferred editor. Type, or copy and paste, the contents of the following program:
var five = require("johnny-five");
var Tessel = require("tessel-io");
var board = new five.Board({
  io: new Tessel()
});
board.on("ready", function() {
  // 1
  var leds = new five.Leds(["a0", "a1", "a2", "a3", "a4", "a5"]);
  // 2
  leds.blink(500);
});
Since nothing has changed about steps 1 through 5, I’ve omitted the annotation comments from the code and I’m going to skip them now (starting back at 1) and focus only on the part of the code that’s changed:
- Create a new instance of the
Ledscollection class, specifying that LEDs will be attached toPORTA, pins0,1,2,3,4and5, using the shorthand string notation"a0","a1","a2","a3","a4","a5". - Call the
blink()method of theledsinstance object, specifying 500ms on-off periods.
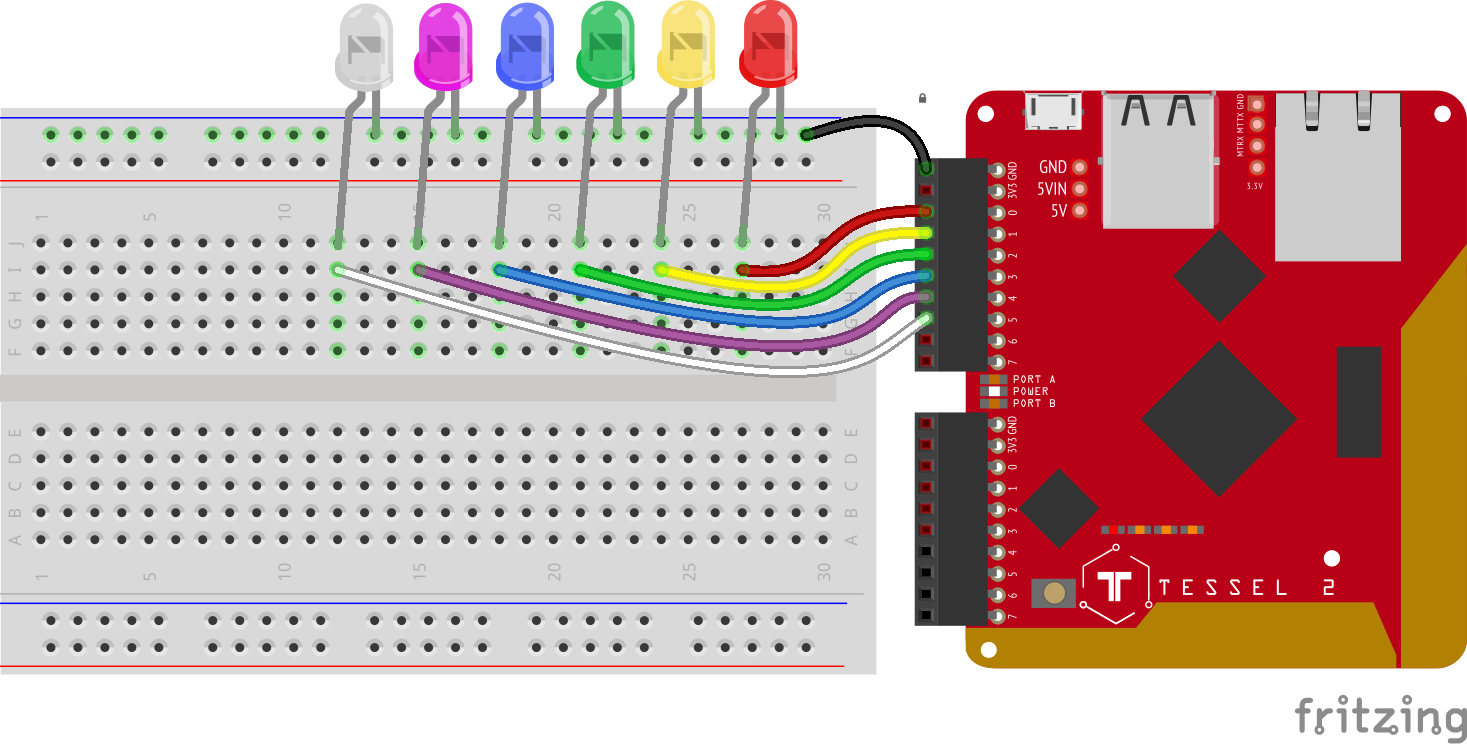
Next, connect your LEDs to the Tessel 2 via the solderless breadboard.
Now you can run the program from your terminal with:
t2 run rainbow.js
And it should look like this:
… Which is not very interesting at all—in fact, the whole effect could be achieved by connecting all of the LEDs in series and controlling them with a single pin! For something more interesting, take a look at the next example; first create a new file called larson.js and open it in your preferred editor. Type, or copy and paste, the contents of the following program:
var five = require("johnny-five");
var Tessel = require("tessel-io");
var board = new five.Board({
  io: new Tessel()
});
board.on("ready", function() {
  var index = 0;
  var step = 1;
  var leds = new five.Leds(["a0", "a1", "a2", "a3", "a4", "a5"]);

  // 1
  this.loop(20, function() {
    // 1.1
    leds.off();
    // 1.2
    leds[index].on();
    // 1.3
    index += step;
    if (index === 0 || index === leds.length - 1) {
      step *= -1;
    }
  });
});
I’m only going to focus on the parts that are relevant to my previous point:
- In an async loop:
- Call the
off()method of theledsobject. This will shut off all LEDs under the control of the collection instance. - Call the
on()method of the LED located atindexof the collection. - Increment or decrement the
index.
- Call the
Express Yourself
For this next project, I’m going to scale back to a single LED—however, the BlinkM is no ordinary LED. This component is an RGB LED controlled via an I2C interface, which means that it requires four jumpers to the board: 3V3, GND, SCL and SDA (SCL is pin 0 and SDA is pin 1, on either PORT).
Parts list:
- (1) BlinkM (Available from SparkFun)
- (4) Jumper wires (one each for
GND,3V3,SCLandSDA) - (1) Solderless breadboard
- (1) Tessel 2
Create a new file called blinkm.js and open it in your preferred editor. Type, or copy and paste, the contents of the following program:
var five = require("johnny-five");
var Tessel = require("tessel-io");
var board = new five.Board({
  io: new Tessel()
});
board.on("ready", function() {
  // 1
  var rgb = new five.Led.RGB({
    address: 0x09,
    controller: "BLINKM",
    port: "A",
  });
  // 2
  rgb.color("#ff0000");
});
Again, nothing has changed about steps 1 through 5 (note that there are no additional libraries to load), but I’m now using a different component class to control the BlinkM.
- Create a new instance of the
Led.RGBcomponent class, setting theaddressproperty’s value to0x09, thecontrollerproperty’s value to"BLINKM", and theportproperty’s value to"a". I could have omitted theaddressproperty from the options, which would signal to the internal controller to use the default address, which also happens to be0x09. Then the instantiation would look like this:
Furthermore, Tessel-IO allows me to omit thevar rgb = new five.Led.RGB({ controller: "BLINKM", port: "a", });portproperty, and will default to using “a”. That further reduces the code I need to write to this:
Note thatvar rgb = new five.Led.RGB({ controller: "BLINKM" });controllerandportvalues are case insensitive. Theaddressproperty is optional for all built-incontrollerobjects in Johnny-Five, but theportproperty is specific to the Tessel IO Plugin. I2C components have specialized internal operations and therefore require a little more information than can be implied by the pin name mapping used in the previous examples. Later we’ll look at an I2C component that has its own pins! - Call the
color(...)method of thergbinstance object, specifying the hexadecimal color code"#ff0000".
Next, connect your BlinkM to the Tessel 2 via the solderless breadboard.

Back in your terminal, run with:
t2 run blinkm.js
And it should look like this:
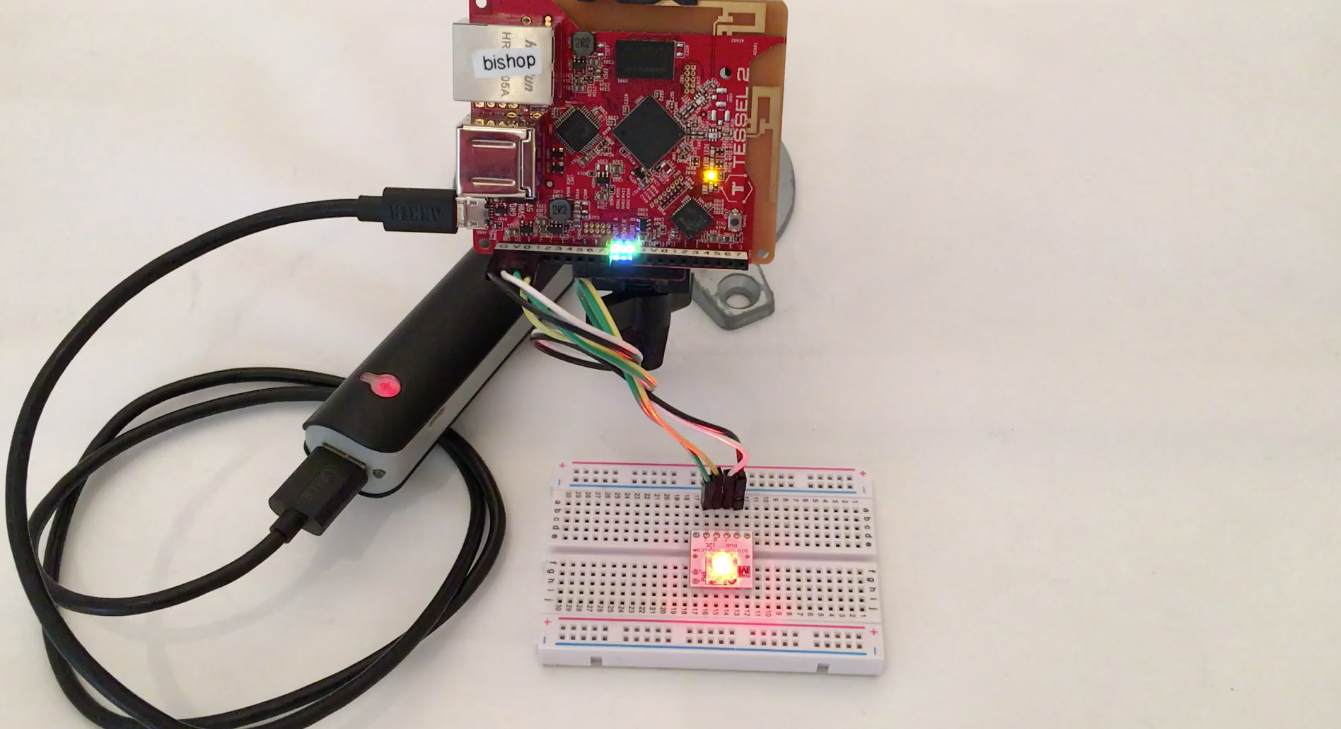
This is fine, but not expressive at all. Let’s try controlling the intensity of the color:
var five = require("johnny-five");
var Tessel = require("tessel-io");
var board = new five.Board({
io: new Tessel()
});
board.on("ready", function() {
// 1
var rgb = new five.Led.RGB({
  controller: "BLINKM"
});
// 2
var level = 1;
var interval = 10;
var step = 10;
// 3
rgb.color("#ff0000").intensity(0);
// 4
this.loop(interval, function() {
// 4.1
if (level >= 100 || level <= 0) {
step *= -1;
}
// 4.2
rgb.intensity(level += step);
});
});
Now we’re getting a little more interesting, right? Let’s pick this apart:
- Create a new instance of the
Led.RGBcomponent class—you’re already an expert in this, so no more discussion is needed. - Declare and assign values to three variables:
levelto1,intervalto10(10ms = 100Hz) andstepto10.levelwill track the value of the intensity level from 0-100%,intervalis the time in milliseconds between each loop iteration, andstepis the number to increase or decrease on each iteration. - Call the
color(...)method of thergbobject with hexadecimal color code"#ff0000", then chain a call to theintensity(...)method with value0. This will set the color to red, but the intensity level will be 0, so it will initially appear to be off (not that your slow human eyes will ever notice). - Inside the
boardobject’s"ready"event handler, thethisobject is that of theBoardinstance itself, ie.(this === board) === true. As such, call theboardobject’sloop(...)method withintervaland a callback to call on each iteration. In a loop:- If the
levelhas gone over 100 or under 0, invert thestepvalue. - Call the
intensity(...)method of thergbobject with the result of adding thestepvalue to the presentlevelvalue.
- If the
Ok, now let’s play with color and intensity:
var five = require("johnny-five");
var Tessel = require("tessel-io");
var board = new five.Board({
  io: new Tessel()
});
board.on("ready", function() {
  var rgb = new five.Led.RGB({
    controller: "BLINKM"
  });
  // 1
  var level = 100;
  var interval = 5;
  var step = 1;
  // 2
  var nulls = [null, null, null];
  // 3
  rgb.intensity(level);
  // 4
  this.loop(interval, function() {
    if (level >= 100 || level <= 0) {
      // 4.1
      if (level <= 0) {
        rgb.color(
          // 4.1.1
          nulls.map(randomUint8)
        );
      }
      step *= -1;
    }
    rgb.intensity(level += step);
  });
  // 5
  function randomUint8() {
    return (Math.random() * 0xFF) >>> 0;
  }
});
Ok, let’s get cozy with this version of the program:
- The initial values of
level,intervalandstephave changed to100,5(5ms = 200Hz) and1, respectively. - In addition to
level,interval, andstep,nullsis declared and assigned to[null, null, null], which will be used to generate new arrays of unsigned 8-bit integer (uint8) values that are passed tocolor(...). - Call the
intensity(...)method of thergbobject withlevel. - The call to
this.loop(...)now accepts theintervalvariable as its first argument, instead of a magic number. In a loop:- If
levelis less than or equal to0:- Call the
color(...)method of thergbobject with a new array of uint8 values.
- Call the
- If
- Define a function called
randomUint8(), which will return a random uint8 number value. It’s important to call out that the invocation ofcolor(array)is not a mistake: Johnny-Five does its best to be as accommodating as possible. In this case that means color can be defined several different ways that are all equivalent:// A hexadecimal String, with or without the leading `#`: rgb.color("#FF0000"); rgb.color("FF0000"); // An Array of bytes that are automatically UInt8 clamped: rgb.color([0xFF, 0x00, 0x00]); // An Object with red, green, and blue properties, // whose values are automatically UInt8 clamped: rgb.color({ red: 0xFF, green: 0x00, blue: 0x00 ]);
Let’s see that program in action:
I’m going to swap out the BlinkM with two diffused RGB LEDs, which will be driven by an Adafruit 16-Channel 12-bit PWM/Servo Driver (PCA9685). The driver is required here because the Tessel 2’s firmware does not yet support direct PWM output. The “pulsing” color change pattern will remain, but it will be used for both LEDs.
Parts list:
- (2) 5mm Diffused RGB LED
- (1) Adafruit 16-Channel 12-bit PWM/Servo Driver (PCA9685)
- (13) Jumper wires
- (1) Solderless breadboard
- (1) Tessel 2
Create a new file called dueling-rgbs.js and open it in your preferred editor. Type, or copy and paste, the contents of the following program:
var five = require("johnny-five");
var Tessel = require("tessel-io");
var board = new five.Board({
  io: new Tessel()
});
board.on("ready", function() {
  // 1
  var left = new five.Led.RGB({
    isAnode: true,
    controller: "PCA9685",
    pins: [ 0, 1, 2 ],
  });
  var right = new five.Led.RGB({
    isAnode: true,
    controller: "PCA9685",
    pins: [ 4, 5, 6 ],
  });
  var level = 100;
  var step = 5;
  var interval = 5;
  // 2
  left.intensity(level);
  right.intensity(level);
  // 3
  this.loop(interval, function() {
    if (level >= 100 || level <= 0) {
      // 4
      if (level <= 0) {
        // 5
        left.color(randomRGB());
        right.color(randomRGB());
      }
      step *= -1;
    }
    // 6
    level += step;
    left.intensity(level);
    right.intensity(level);
  });

  // 7
  function randomRGB() {
    return [null, null, null].map(function() {
      return (Math.random() * 0xFF) >>> 0;
    });
  }
});
- Initialize two
Led.RGBinstances, both withisAnode: trueand appropriate pins. The order of pins in the pins array corresponds to[ red , green, blue ]. - Call the
intensity(...)method of both theleftandrightobjects, with the initial value oflevel. - In a loop:
- If
levelis less than or equal to0:- Call the
color(...)method of both theleftandrightobjects, with an array of uint8 values returned byrandomRGB().
- Call the
- Call the
intensity()method of both theleftandrightobjects, with the updated value oflevel.
- If
- Define a function called
randomRGB(), which will return an array containing 3 random uint8 values.
The here’s the circuit to assemble:
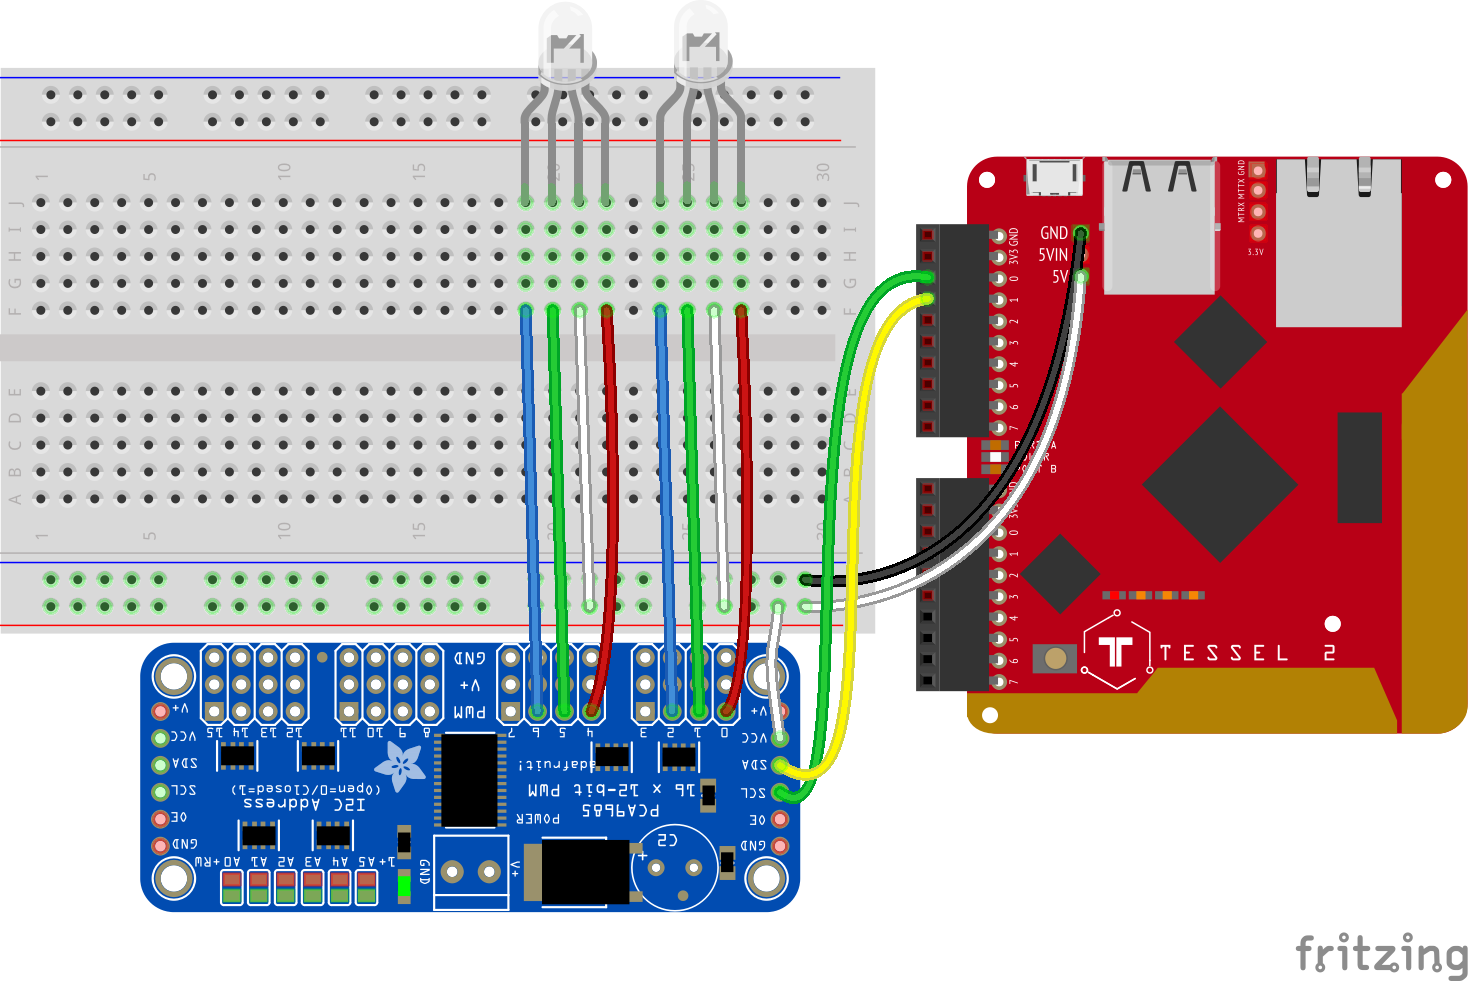
Go ahead and deploy this program to your Tessel:
t2 run dueling-rgbs.js
Assuming everything was connected correctly, the result should look something like this:
Say “Hello World”
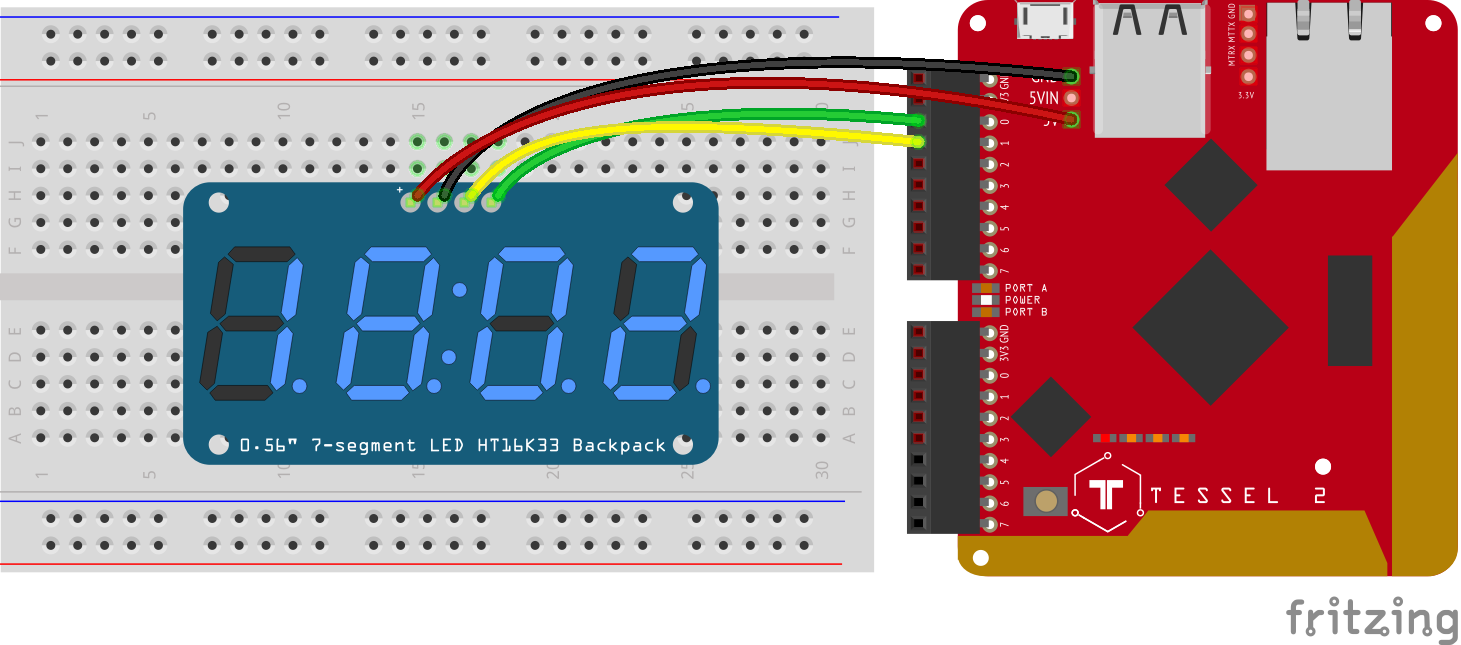
So far I’ve limited the “voice” of my Tessel 2 to LED demonstrations, which are fun but also relatively trivial. The title of this article is Say “Hello World” with Johnny-Five on Tessel 2 and my goal is to deliver exactly that. In this section, I will show how to “say” the words with a digital display and a Tessel 2.
Parts list:
- (1) Adafruit 0.56″ 4-Digit 7-Segment Display
- (4) Jumper wires
- (1) Solderless breadboard
- (1) Tessel 2
Create a new file called hola.js and open it in your preferred editor. Type, or copy and paste, the contents of the following program:
var five = require("johnny-five");
var Tessel = require("tessel-io");
var board = new five.Board({
  io: new Tessel()
});
board.on("ready", function() {
  // 1
  var display = new five.Led.Digits({
    controller: "HT16K33",
  });
  // 2
  display.print("Hola");
});
Short and sweet, but let’s look at the annotated parts:
- Create a new instance of the
Led.Digitscomponent class, setting thecontrollerproperty’s value to"HT16K33". - Call the
print(...)method of thedisplayobject, with the string “Hola”.
Assemble the parts:
Return to the terminal and run the following:
t2 run hola.js
Now let’s update the program to display “Hello World” and scroll the message from right to left infinitely. No changes to the hardware are necessary, just create a new file called hello-world.js and open it in your preferred editor. Type, or copy and paste, the contents of the following program:
var five = require("johnny-five");
var Tessel = require("tessel-io");
var board = new five.Board({
  io: new Tessel()
});
board.on("ready", function() {
  var display = new five.Led.Digits({
    controller: "HT16K33",
  });
  // 1
  var message = "Hello World";
  var index = 0;

  this.loop(200, function() {
    // 2
    var chunk = message.slice(index, index + 4);
    // 3
    if (chunk.length < 4) {
      // Coming soon in ES7: String.prototype.padLeft!
      chunk += " " + message.slice(0, 3 - chunk.length);
    }
    // 4
    display.print(chunk);
    // 5
    if (++index > message.length) {
      index = 0;
    }
  });
});
This is straight forward, but let’s look at each step to fully understand the semantics of this program:
- Declare and assign values to two variables:
messageto"Hello World"andindexto0.messageis obviously the string characters that will be shown on the display, andindexwill be used to track that starting index for each iteration. - Inside the
boardinstance’sloop(...)method callback, declare the variablechunkand assign it the value of a new string created by slicing four characters from themessagestring, starting from theindex. In a loop:- If the length of
chunkis less than the4(the number of characters that can be displayed at once), then concatenate an empty space (" "), followed by a slice of themessagestring, from the beginning to whatever the difference of3(the remaining number of characters after the empty space) and the presentchunk.length. This is how the display will appear to “cycle” the contents ofmessagein from the right edge to the left edge. - Call the
print(...)method of thedisplayobject, with the string contents of thechunkvariable. - If the
indexis greater than the length ofmessage, setindexback to0. This is how the display will appear to “cycle” the contents ofmessageinfinitely.
- If the length of
And finally, it will say “Hello World,” just like this:
Next Steps
This article has shown several different ways to convey some kind of information from a program running on a Tessel 2 to the outside world, but the capabilities don’t end here. Think about how a program might convey information that is relevant to the environment surrounding the device itself. Consider displays you might take for granted: microwave, stove, digital clock, remote control, and game pad indicator lights. What about the difference between text based “notifications” versus simple indicator lights that have some meaning assigned to them. What are the pros and cons of each?
LedAPI: