JavaScript: Arduino Servo Control Tutorial
Posted by Rick Waldron
This is the first tutorial in a new series geared towards Arduino programming on Node.js, using the Johnny-Five framework.

At the end of the first article, I showed a simple program that would strobe an LED at the default rate of 100ms per phase. It’s pretty safe to assume that all starter kits come with LEDs. As the tutorials progress, I will introduce more diverse hardware — so you’ll need a few supplies to keep pace. I recommend investing in either of the following start kits:
The Ultimate Microcontroller Pack or the Inventor’s Kit for Arduino both come with everything you’ll need for almost all of the tutorials, however in some cases, they will need to be supplemented with additional parts. For a complete list of the parts I’ve used so far, check out the Johnny-Five Parts List.
Tutorial Requirements:
- One (1) Arduino Microcontroller Board
- One (1) 9V wall wart adapter plug or 9v battery harness
- Three (3) Jumper cables: red, black, yellow
- One (1) Any size Servo
First, set up the hardware using this schematic as your guide:
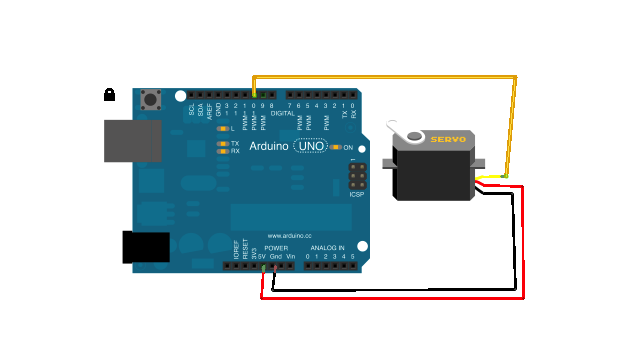
Connect the following…
- Black > GND
- Red > 5v
- Signal > Digitial PWM Pin 10 (Yellow or White)
- Microcontroller > USB
- 9V Power
Assuming you’re using the actual repo, open up eg/servo.js, or follow along here…
setup.js
var five = require("johnny-five");
var board = new five.Board();

// Wait for the board and serial line to
// be connected and ready:
board.on("ready", function() {

 // make robots here!

});
If you run this now, you’ll notice that it creates a REPL session – you can access the board object directly from here.
Next, let’s add a Servo object and inject into the REPL:
add-servo.js
var five = require("../lib/johnny-five.js");
var board = new five.Board();

board.on("ready", function() {

  // The servo signal line is connected to
  // Digital PWM Pin 10
  var servo = new five.Servo(10);

  // You can add any objects to the board's REPL,
  // Let's add the servo here, so we can control
  // it directly from the REPL!
  board.repl.inject({
    servo: servo
  });
});
And that’s it!
Run node eg/servo.js1 and try out some of the following commands from the REPL:
commands.js
// set the servo to the minimum degrees
// defaults to 0

servo.min();


// set the servo to the maximum degrees
// defaults to 180

servo.max();


// Centers the servo to 90°

servo.center();


// Moves the servo to position by degrees

servo.move( 90 );


// Perform a min-max cycling servo sweep (defaults to 0-180)

servo.sweep();
Hopefully this has ignited some creative ideas for JavaScript Arduino programming with Johnny-Five! Remember to watch this space for more tutorials!
Note: There is a known issue in where the Firmata protocol layer has issues freeing itself on the serial line which results in the program hanging in the ready state. For now, ^C to kill the hanging program and simply run it again.