Synchronizing HTML5 Slides with Node.js
Posted by Tim Branyen
I gave a talk in February on Advanced jQuery Templates that had an interesting and unique twist. Instead of changing slides using traditional presentation delivery methods such as a clicker or a laptop keyboard, I used my smartphone which made asynchronous calls to a Node.js server. The server then propagated events to all connected viewers, regardless of Internet connection or device.
This post provides all the code necessary to run the Node.js server, the controller on a smartphone (or any device that has a web browser) and the client-side component necessary to work with various HTML5 slide decks.
Before diving in, here is a demo of the code in action:
Dependencies
As with any new technology demonstration, there are certain dependencies needed in order to run the code successfully. The following must be installed on your server:
- Node.js – http://nodejs.org/
- NPM – http://npmjs.org/
- Socket.io – http://socket.io/
- Express – http://expressjs.com/
I recommend installing Node.js first and then installing NPM. Create a directory to contain the server code, cd into it in the terminal and install Socket.io and express with the following command npm install socket.io express. You install inside a folder, because NPM puts modules in a node_modules subfolder locally.
I am using tabdeveloper.com as my hostname and port 1987 in all my examples. You will need to change these to match your own environment.
Assembling the server
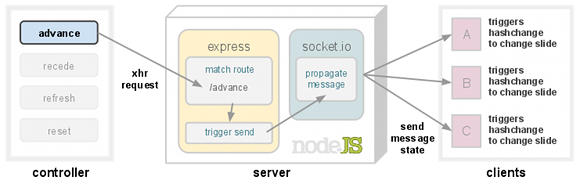
The server component runs continuously and listens for messages to be sent by the remote controller. It then propagates the message to all connected clients. Routing is handled by Express and the message propagation is executed through Socket.io. Express creates a wrapped HTTP server with createServer() and returns an app to bind Socket.io and define routes on.
The following code blocks are excerpts that can be viewed as a whole at the end of the post:
The server must maintain two variables: current slide position state and connected clients clients. The last line binds Socket.io to Express so the same port can be used.
slides-requirements.js
// Required dependancies
var io = require('socket.io');
var app = require('express').createServer();
var fs = require('fs');

// State is the current slide position
var state = 1
// Clients is a list of users who have connected
var clients = [];
// Bind socket.io to express
var socket = io.listen(app);
Before defining the routes for the server to handle moving forwards and backwards, the server socket must listen for incoming connections from clients and save them for reuse. The socket has only one task: sending messages. The send function facilitates the message sending and prunes out disconnected clients. Pruning keeps the looping efficient (no unusable items) this keeps memory usage lower (assuming hundreds/thousands connecting and disconnecting at a conference).
slides-connection.js
// For each connection made add the client to the
// list of clients.
socket.on('connection', function(client) {
  clients.push(client);
});

// This is a simple wrapper for sending a message
// to all the connected users and pruning out the
// disconnected ones.
function send(message) {
  // Iterate through all potential clients
  clients.forEach(function(client) {
    // User is still connected, send message
    if(client._open) {
      client.send(message);
    }
    // Prune out disconnected user
    else {
      delete client;
    }
  });
}
Defining routes is very easy and intuitive. Routes are created for each action handled inside the slide deck code. The state variable is only updated inside the advance and recede routes. The default route is specified by the asterisk and will serve up the remote for a controller device.
slides-routes.js
// Advancing will... move the slides forward!
app.get('/advance', function(req, res) {
  // Increment and send over socket
  state++;
  send({ state: state });

  // Send the state as a response
  res.send(state.toString());
});

// Receding will... move the slides backwards!
app.get('/recede', function(req, res) {
  state--;
  send({ state: state });

  res.send(state.toString());
});

// This will allow the presenter to clear the
// slides of any cornification.
app.get('/refresh', function(req, res) {
  client.send({ refresh: true });

  res.send(state.toString());
});

// Reset will not refresh cornfication, but
// will send the slides back to the beginning.
app.get('/reset', function(req, res) {
  state = 1;
  send({ state: state });

  res.send(state.toString());
});

// Give your viewers what they really want...
// an unrepentable amount of unicorns.
app.get('/cornify', function(req, res) {
  send({ cornify: true });

  res.send(state.toString());
});

// Send the controller for any other request to this
// Node.js server.
app.get('*', function(req, res) {
  fs.readFile('controller.html', function(err, buffer) {
    res.send(buffer.toString());
  });
});
Once all routes are defined, set the port to listen on.
slides-listen.js
// Listen on some high level port to avoid dealing
// with authbind or root user privileges.
app.listen(1987);
Injecting the client into the slide deck
The client component resides in the existing slide deck and augments it by establishing a real-time socket which receives messages from the server and reacting. The slide deck must use hashchange for the following code to work. If the slide deck does not respond to hashchange events to change the slide, other options should be explored such as simulating keyboard events or finding the functions in the slide deck source and triggering them manually.
This file will most likely be included with the rest of the slide deck source, or embedded inline. End users should have a choice to disable remote control, so logic is implemented in the beginning to allow a button to enable and disable synchronization.
Messages sent from the server can be handled elegantly with conditional logic: If a state property is provided, then change the slide. If the cornify* function is present and the message is sent, then cornify* the user. Lastly if the refresh message is sent, then reload the page.
client.js
(function(window, document) {

  // The end user should be allowed to disable synchronization.  This button
  // is optional on the page
  var syncAllow = true;
  var syncButton = document.querySelector('.sync-button');

  // If the sync button exists bind a click event and toggle the syncAllow
  // boolean.  Set the value of the button.
  if(syncButton) {
    syncButton.addEventListener('click', function() {
      syncAllow = !syncAllow;
      syncButton.setAttribute('value', syncAllow ? 'Turn Sync Off'
        : 'Turn Sync On');
    }, true);
  }

  // The socket.io client side library connects to your server, the node address
  // can be a domain name or an ip address.
  var socket = new io.Socket('tabdeveloper.com', { port: 1987 });

  // Connect the websocket (or fallback)
  socket.connect();

  // When the server pushes a message handle it accordingly
  socket.on('message', function(e) {
    // Set the hash to match the state
    if(syncAllow && e.state) {
      location.hash = e.state;
    }

    // If the message is cornify and cornify_add is a function, trigger.
    if(e.cornify && typeof cornify_add === 'function') {
      cornify_add();
    }

    // Reload the page to clear all the cornification.
    if(e.refresh) {
      location.reload(true);
    }
  });

})(this, this.document);
The remote controller
The basic markup necessary to use the actions above: (styling is required for the swipe area, visible in the full file)
controller-markup.html
<button value="reset">RESET</button>
<button value="refresh">REFRESH</button>
<div class="swipe"> SWIPE </div>
<button value="cornify">CORNIFY</button>
The controller has several responsibilities, but the most important is getting the correct action from the presenter and sending it to the server as a message. Since the server doesn’t respond with anything particularly useful, triggering asynchronous requests can happen without needing a callback. The xhr function simply creates a new XHR object, opens a connection, and sends the request. In my markup the button values directly correspond with the server route mapping.
controller-def-n-req.js
var server = 'http://tabdeveloper.com:1987/';

// Luckily a response from the server is never required. So
// a basic XHR GET request to the server will trigger the
// action appropriately.
function xhr(url) {
  var request = new window.XMLHttpRequest();
  request.open('GET', url, true);
  request.send(null);
}

// The values of the buttons correspond with the Node.js server
// routes.
var buttons = [].slice.call(document.getElementsByTagName('button'));
buttons.forEach(function(button) {
  button.addEventListener('click', function() {
    xhr(server + button.value);
  }, true);
});
The swipe code isn’t covered in this post, but I chose that approach for changing slides. You can see it in the complete controller file.
Putting it all together
If this is new ground for you and you’ve made it this far, great! It’s not complicated when taken step-by-step. The remote controller sends messages to the server. The server listens for messages and dispatches them to all connected clients. Each client handles received messages and manipulates the slide deck.
To put all this together yourself, you may want to look at the full source of each file:
- Server source: slides.js
- Client source: client.js
- Controller source: controller.html
I have included the client component like this in my own slides:
example.html
...
<head>
...
  <!-- HTML5 slides scripts, put these underneath -->
  <script src="http://www.cornify.com/js/cornify.js"></script>
  <script src="http://tabdeveloper.com:1987/socket.io/socket.io.js"></script>
  <script src="client.js"></script>
...
</head>
...

<body>
...
<!-- Optionally slap in a sync button -->
<input type="button" class="sync-button" value="Turn Sync Off">
...
- I use the terms cornify and cornification throughout the article to refer to an Internet gag that is popular throughout the client-side development community. Cornify when triggered will add unicorn images and distort the page.