Make your own JavaScript Ninja with Processing.js
Posted by Alistair Macdonald
 .NET Magazine: Mom will be proud!
I was asked back at the start of the year by .NET Magazine (Practical Web Design in the US) to write a JavaScript article on the subject of my choice. I doubt you read the article because I went to the stores and bought all the copies. (Had to send copies to dear old Mom n’ Pop and everyone else back at the Shire, you know how it is. ;)).
With the Boston stores being completely out of stock, and my dog hogging the last copy, I thought it would be good idea to throw the article in to a blog post. Plus… who wants to go to all the effort of copying all that code from the pages of a magazine, or go hunting through a CD to find the demo? Not me! So without further ado, here is a copy of the Processing.js tutorial, with working code examples.
But if you have absolutely no intention of learning how cool Processing.js is, or you’re just a bit short of time and want to see the Processing.js Ninja in action, click here to check out the final demo.

Play anywhere: Processing.js gives web developers and artists a way of producing online games and animations, without having to use any Flash or Java applets.
Master Canvas & Processing.js
Knowledge needed: JavaScript, HTML, CSS Requires Text editor: any browser except Internet Explorer Project time: 2 hours
Rich interactive web content used to be available in two flavors, Flash or Java. Today, the technological landscape looks very different. One of the ideas popularised in the 1990s was that the desktop as we know it could be replaced by an entirely web-based operating system. At the time, the idea seemed ridiculous, but modern browsers are powerful enough to handle an ever-increasing array of tasks.

Add depth: Our ninja is 2D, but the Copperlicht JavaScript 3D Engine can help you create scenes like this. To start developing for the 3D HTML context, download the latest build of Firefox, enable WebGL in about:config and visit learningwebgl.com.
jQuery broke down the boundaries between the old paradigm and the new, giving us rich interactivity that was simple to implement, great to look at, and loaded quicker than any plug-in could. But it didn’t end there.
One of the more interesting changes has been the advent of immediate-mode-graphics in the browser, commonly referred to as the canvas element. Originally invented by Apple to power mini-applications such as desktop widgets, the canvas element sparked a phenomenal movement of web artists, data visualizers, UI experimentalists and game creators, who just needed a browser, some JavaScript and a healthy dose of creativity to change the web. 3D hardware support for the browser has already crossed the horizon and will be with us shortly, even on our mobile phones. With all these features being handed to the front-side, we need solid ways to harness this power.
Processing Syntax
While the Processing language uses Java syntax, Processing.js supports both Java and JavaScript methods, enabling you to use JavaScript libraries such as jQuery in your code, adding a powerful DOM access layer between the visualization and the DOM. If you need help learning Processing.js, WebGL, or find bugs and missing features, point your IRC client to irc.mozilla.org, join the #processing.js channel and introduce yourself to the community.
Sketching your Figure
Processing.js code is lightweight, simple to learn and ideal for developing web-based games. In this tutorial, we’re going to use Processing.js to create a ninja. Obviously you can adapt the skeleton we’ll build here to create all sorts of animated figures for your web projects. First, take a quick look at the HTML:

Congratulations: This green square means you’ve set up Processing.js successfully.
background(#00ff00);

Zen: The development environment is remarkably simple.
The ninja classes are recycled from code examples found on the Processing website. This library import extends Processing.js to handle the cartoon physics and provide some shortcuts for styling the ninja with fewer lines of code.
Update the code in your sketch to include two functions called setup() and draw(). Processing sketches usually follow this simple pattern: first, any variable or class definitions outside the main functions are set, then the setup() function is called, where the screen and environment are set up. Setup() can also be recalled when a sketch starts over, to reinitialize variables. Finally, the draw() loop is called for every frame of your program, creating your animation.
// Setup Screen
void setup(){
  frameRate(60);
  size(400, 300);
};

int ninjaX=width/2; ninjaY=height/2;

// Main Looping Draw Rountine
void draw(){
  background(#555658);
  noStroke();
  fill(#3e3e40);
  rect(0, height/2, width, height);
};
Background(#555658) fills the background with a light shade of grey and noStroke() forces shapes to be drawn without borders around them. Fill(#3e3e40) tells Processing.js that the following shape will be filled with a darker shade of grey and rect(0, height/2, width, height) draws the rectangle that’ll become the floor on which the ninja crouches. You may have noticed that global variables such as width and height, as well as size() and frameRate(), are automatically available to your sketch.
Coming equipped with an array of global variables and useful methods makes Processing.js a quick and powerful tool for developing visual interaction on the web. Having set the stage, you need an actor. Update ninja.pjs with:
// Setup Screen
void setup(){
  frameRate(60);
  size(400, 300);
};

int ninjaX=width/2; ninjaY=height/2;
float trackAngle=0, trackX=0, trackY=0;

// Main Looping Draw Routine
void draw(){
  style({ background:#555658, noStroke:true, fill:#3e3e40 });
  rect(0, height/2, width, height);
  drawNinja();
};

void mouseMoved(){

  // Track Ninja to Mouse
  trackX = mouseX-ninjaX; trackY = mouseY-ninjaY;

  // Set the Track Angle
  trackAngle = -atan2(trackX, trackY);
};

void drawNinja(){
  pushMatrix();
    translate(ninjaX, ninjaY);
    pushMatrix();

      // Offset Ninja by Tracking Angle
      translate(-sin(trackAngle)*4,0);
      fill(0);
      rect(-20, 0, 40, 40); // Draw Body Box
      pushMatrix();
        translate(-sin(trackAngle), -40);

        // Draw Head
        arc(0, 0, 60, 0, TWO_PI, false);
      popMatrix();
    popMatrix();
  popMatrix();
}
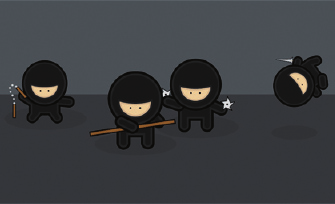
Ninja style: The styles of our ninja are based on the excellent work of Chris Spooner as seen on his web site: http://blog.spoongraphics.co.uk.
This introduces some key features. Firstly, you’ve reduced the four lines needed to draw the background by using the style() function. This function isn’t native to Processing.js but is one of the extensions in ninja.classes.lib. Second, you’ve added tracking variables so that your character can follow the movement of the mouse. This is computed in the mouseMoved() method, so that the variables are updated whenever the mouse moves on the canvas. Thirdly, you’ve added the drawNinja() method, which draws the body and head of the ninja, offsetting the draw commands by the value stored in the tracking variable. This creates the effect that the ninja is commanded by the movement of your mouse pointer.
You’re using the fill() command with a different type of variable here. Before, you passed in a hexadecimal colour as an argument. This time, it’s a single integer, creating a greyscale fill from 0-255. You can also pass in three or four integers: fill(255, 0, 0) for red or fill(0, 255, 0, 128) for transparent green.
Also introduced is the arc() command, with the following arguments: arc(x, y, width, height, start-angle, stop-angle). The angles are calculated in radians, but Processing.js, being the useful language it is, can convert between radians and degrees by calling radians(degrees) or degrees(radians).
Enter The Matrix
Matrix maths is a key component of any graphics language. Even if you’re more familiar with Photoshop and Illustrator than with graphics programming languages, you’ll have used transformation matrices, whether you were aware of it or not. When you create a new layer, you’re creating a new transformation matrix. A transformation matrix enables you to apply transformations to a group of objects.
Transformation matrices are powerful tools. It’s far easier to calculate geometry locally and transform a group’s spacial coordinates than it is to account for all your transformations manually. Fortunately, the transformation matrix commands in Processing are simple to master:
pushMatrix(): Think of this command as creating a new layer. Every command, from this point onwards, will share the same coordinate space, and move in unison.
popMatrix(): Making a call to popMatrix() ends the current layer and returns Processing.js to the previous coordinate space.
translate(x, y): Translating the matrix offsets the current set of coordinates by the x and y values passed.
rotate(radians): This turns the current matrix about its origin. If you think of the current matrix as a sheet of paper, the origin would be the pin that tacks it to a board. If you turn the paper, it rotates around the position of the pin. The default origin for a matrix is (0x, 0y), so to rotate a layer around its centre, there are two solutions. The first is to draw your objects around the origin, so the top-left coordinates of a 100-pixel wide box would become (-50x, -50y). Sometimes, you don’t have the luxury of redefining every coordinate in your matrix this way, in which case you can combine translate() and rotate() to get the job done. To rotate a 100-pixel box around its center, shift the matrix like so:
 For no rotation of the box: rotate(0); |
 To rotate around origin of box (0x, 0y): rotate(0.5); |
To translate the origin to (50x, 50y): translate(50, 50); rotate(0.5); translate(-50, -50); |
scale(x, y): This changes the size of the current matrix. You can pass one argument to scale the matrix’s X and Y axes proportionally, or pass different values for X and Y to warp the image. Scale(2) will multiply the coordinates by 200% and scale(0.5) will halve the size of everything within your matrix.
Stop Hitting Yourself!
An effective ninja wouldn’t be complete without limbs. So use the Limb class from ninja.classes.lib to add the following to the top of your sketch:
// Something to hit with...
Limb armL = new Limb({ x: -30, y: 0, restX: 0, restY: 0, boneLength: 30 });
Limb armR = new Limb({ x: 30,  y: 0, restX: 400, restY: 0, boneLength: 30 });
Limb legL = new Limb({ x: -65, y: 75, restX: 25, restY: 40, boneLength: 30 });
Limb legR = new Limb({ x: 65,  y: 75, restX: 25, restY: 40, boneLength: 30 });
The Limb class handles the simple physics for your ninja’s arms. The restX and restY variables store the direction at which the arms come to rest. For your ninja, the arms will always rest in the direction of the mouse. To achieve this, we add the following code to the beginning of our drawNinja() function.
void drawNinja(){
  armL.restX = trackX; armL.restY = trackY; // Apply Tracking to Left Arm
  armR.restX = trackX; armR.restY = trackY; // Apply Tracking to Right Arm
  legL.restX = -25-sin(trackAngle); // Apply Tracking to Left Leg
  legR.restX = 25-sin(trackAngle); // Apply Tracking to Right Leg
  pushMatrix();
Now that the Limbs know where to point next, call the method that does the pointing: limb.calc(). After the limb’s position has been updated, you can call limb.draw() to render the object to the canvas. Add the following code between the matrices in the drawNinja() function.
void drawNinja(){
  armL.restX = trackX; armL.restY = trackY; // Apply Tracking to Left Arm
  armR.restX = trackX; armR.restY = trackY; // Apply Tracking to Right Arm
  legL.restX = -25-sin(trackAngle); // Apply Tracking to Left Leg
  legR.restX = 25-sin(trackAngle); // Apply Tracking to Right Leg
  ...
       popMatrix();
       armL.calc(); armL.draw();
       armR.calc(); armR.draw();
     popMatrix();
     legL.calc(); legL.draw();
     legR.calc(); legR.draw();
   popMatrix();
  }
}
The deepest nested matrix can be called matrix 3. This contains the ninja’s head. The second deepest is for the body and the shallowest represents the whole ninja object, which is offset by the values of ninjaX and ninjaY. Placing different parts of the body in different matrices enables you to control various parts of the character independently. So add the arms to the same matrix as the body – since the arms are primarily attached to the body, they should move when it moves.
The legs are primarily attached to the ground, so place the legs in the root matrix, and point them in the direction of the body to create the sense that your ninja behaves much like he would in the real world.
Now that your character can move like a ninja, it’s time you made him look like one. There’s a nice shortcut you can take when you want to apply an array of styles to multiple objects. Create a function to do just this.
// Apply Common Styles Before Draw Callbacks
void ninjaStyle(Object callBack){
  style({ noFill:true, stroke:#000000, strokeWeight:20.5 });
  callBack();
  style({ stroke:#2a2a2b, strokeWeight:15 });
  callBack();
  style({ strokeJoin:ROUND, fill:#1d1d1e, stroke:#1d1d1e, strokeWeight:10 });
  callBack();
};
The ninjaStyle() function takes one argument: a function. The function you pass to your style method contains an arbitrary draw command. The styles for your ninja are created by stroking thinner grey lines over thicker black ones. When the ninjaStyle() function receives a draw command, it applies the first style, then executes the command it was passed. Next, it applies the second style, and so on. This significantly reduces the number of lines of code in the sketch. Next, update the code in drawNinja() to apply some stealthy styles:
void drawNinja(){
  ...
  popMatrix();
  armL.calc();
  ninjaStyle(function(){ armL.draw(); });
  armR.calc();
  ninjaStyle(function(){ armR.draw(); });
  popMatrix();
  legL.calc();
  ninjaStyle(function(){ legL.draw(); });
  legR.calc();
  ninjaStyle(function(){ legR.draw(); });
  popMatrix();
}
Finally, add the finishing touches to the ninja. To reduce the total number of lines of code and make it easier to read, create an intermediary stage to handle the limbs. The drawLimbs() function receives an array of Limb objects, calculates their positions and passes them to the ninjaStyle() function to draw.
void drawLimbs(Object limbs){
  for (var i=0, l=limbs.length; i < l; i++) {
    limbs[i].calc();
    ninjaStyle(function(){ limbs[i].draw(); });
  }
};
With this intermediary function, you can calculate and draw the arms with:
drawLimbs([armL, armR]);
Now things are neater, give the ninja a face with the beginShape(), bezierVertex(x, y, x1, y1, x2, y2) and endShape() commands. You can use the previously mentioned tracking variables to make the eyes follow the mouse, and even apply the common styles to his body. Here’s the complete code:
// Something to hit with...
Limb armL = new Limb({ x: -30, y: 0, restX: 0, restY: 0, boneLength: 30 });
Limb armR = new Limb({ x: 30, y: 0, restX: 400, restY: 0, boneLength: 30 });
Limb legL = new Limb({ x: -65, y: 75, restX: 25, restY: 40, boneLength: 30 });
Limb legR = new Limb({ x: 65, y: 75, restX: 25, restY: 40, boneLength: 30 });

// Setup Screen
void setup(){
  frameRate(60);
  size(400, 300);
};

int ninjaX=width/2; ninjaY=height/2;
float trackAngle=0, trackX=0, trackY=0;

// Main Looping Draw Rountine
void draw(){
  style({ background:#555658, noStroke:true, fill:#3e3e40 });
  rect(0, height/2, width, height);
  drawNinja();
};

void mouseMoved(){
  trackX = mouseX-ninjaX; trackY = mouseY-ninjaY; // Track Ninja to Mouse
  trackAngle = -atan2(trackX, trackY); // Set the Track Angle
};

void drawNinja(){
  armL.restX = trackX; armL.restY = trackY; // Apply Tracking to Left Arm
  armR.restX = trackX; armR.restY = trackY; // Apply Tracking to Right Arm
  legL.restX = -25-sin(trackAngle); // Apply Tracking to Left Leg
  legR.restX = 25-sin(trackAngle); // Apply Tracking to Right Leg
  pushMatrix();
    translate(ninjaX, ninjaY);
    fill(#3a3a3c);
    ellipse(0+sin(trackAngle)*2, 80, 160, 30); // Shadow
    drawLimbs([legL, legR]); // Draw Legs
    pushMatrix();
      translate(-sin(trackAngle)*4,0); // Offset Ninja by Tracking Angle
      ninjaStyle(function(){ rect(-20, 0, 40, 40); }); // Draw Body Box
      pushMatrix(); // Draw Mask
        translate(-sin(trackAngle), -40);
        ninjaStyle(function(){ arc(0, 0, 60, 0, TWO_PI, false); }); // Draw Head
        style({ fill:#eac89e, stroke:#2a2a2b, strokeWeight:3 });
        beginShape(); // Draw Skin on Face
          bezierVertex(-30, 0, -60, 0, -25, 25);
          bezierVertex(-15, 30, 25, 25, 30, 0);
        endShape();
        style({ fill:#000000, stroke:#caab8e, strokeWeight:3 });
        arc(-10-sin(trackAngle)*7, 8, 6, 6, TWO_PI, 0); // Draw Left Eye
        arc( 10-sin(trackAngle)*7, 8, 6, 6, TWO_PI, 0); // Draw Right Eye
        popMatrix();
        drawLimbs([armL, armR]);
    popMatrix();
  popMatrix();
};

void drawLimbs(Object limbs){
  for (var i=0, l=limbs.length; i < l; i++) {
    limbs[i].calc();
    ninjaStyle(function(){ limbs[i].draw(); });
  }
};

// Apply Common Styles Before Draw Callbacks
void ninjaStyle(Object callBack){
  style({ noFill:true, stroke:#000000, strokeWeight:20.5 });
  callBack();
  style({ stroke:#2a2a2b, strokeWeight:15 });
  callBack();
  style({ strokeJoin:ROUND, fill:#1d1d1e, stroke:#1d1d1e, strokeWeight:10 });
  callBack();
};
Congratulations on making your own JavaScript ninja without any browser plug-ins! What you decide to do with your ninja is up to you. I turned mine into the main character of a dojo-smashing arcade game that updates the DOM with your score. Try out the ninja-final-game find out ... is your foo strong enough to beat the clock?